Tuesday, November 18, 2014

Reclaimed wood sign

I am obsessed with reclaimed wood usually in the form of old pallets. My mom's birthday was this month so I decided to take a break from the remodel to make her an old looking sign.


Supplies:
1. Computer/printer
2. Pallet (or some type of reclaimed wood)
3. Black and white paint (whatever kind works, you will be watering it down anyways)
4. Some type of flat, smoothing device like the bottom of a sharpie or in my case...a fan remote. :) whatever works!
5. Furring strips or some type of thin pieces of wood
6. Nails
7. Small paintbrush
8. Rag or paintbrush to apply water


After hammering off each piece of pallet, I hammered on some furring strips I had lying around to hold all four pallet pieces together. I just used some trim nails I also had lying around. If you have stronger ones it would make hammering easier as my trim nails wanted to bend!


I also chose to white wash the front of the sign so it would match my mom's home better. It helped with the words being more visible as well. Just mix water and white paint to the concentration of paint that you like. Try it out on a scrap piece or the back of the sign. You can always add more so start out with a very watery concentration at first. Let this dry before applying words.

Next, find a saying or quote that you love! Print it out on your computer making sure to have it print mirror image or backwards.


Now, after placing your words where you want them on your wood (words face down) take a cloth or paint brush and wet the paper enough to see the words show through. As u do this, you can gently press down to get the words to kind of "stick" to the wood so they don't move around as much.  Now take an object that has a rounded edge (mine was the back of a small remote) and rub the back of each letter. Do this gently so you don't rip the paper. This is what transfers the ink to the wood so make sure you rub each letter individually and well.

 
This will leave a light version of the words on the wood. To make them stand out more, water down black paint and use a small paintbrush to lightly go over each letter. I watered down my black paint a lot (maybe about 1 cup water to one small squirt of craft paint) because I only wanted to put a VERY thin layer of color on the letters. This helps the sign to look aged.
 
There you have it! A beautiful and rustic sign! I love it. I will definitely be making myself one!


Tuesday, September 30, 2014

Gray is the new beige

Well a lot has happened over the past month but I'll just talk about my love for our new inside paint color! Gray is definitely the new beige. If you follow any of the home TV channels you may have noticed as well. While beige used to be the neutral everyone ran to, it has now been replaced with gray! Sounds like an easy enough color to pick but if you aren't careful you will end up with purple-gray or maybe even too dark of a gray. We chose "place of dust", a rather fitting name, from a company based out of the area called Richard's Paint (again, I'm not advertising or have any affiliation). 


If you are a Pinterest fan search for gray rooms or decor and you will see how versatile gray can be. My favorite is to keep the whole room very neutral. Lots of grays, maybe some beige, blue, or white. Adding details instead of color creates such a neat look! Gray patterned pillows will accent the gray wall in my future living room. In the master bedroom the bedding is also gray with pillows in shades of gray. Have fun with different patterns and textures! Love it!


Wednesday, September 3, 2014

Vinyl Plank Floors!

Well our beautiful new floors are going in upstairs! I love them! We wanted something incredibly durable and waterproof (hello dogs and child). After doing research on all different types of flooring we fell in love with the idea of vinyl click planks. Easy to install and will last a long time! They can even be installed in bathrooms, kitchens, laundry rooms, etc.

Now, vinyl used to be shunned as a cheap flooring, but oh how things have changed! Vinyl plank flooring can be just as expensive as nice hardwood floors and it is actually the "new" thing according to the flooring specialists we spoke with. We actually had trouble finding one in our price range! However, I was persistent and found a great one online.

 
We purchased 1500 sq feet of Feather Lodge Shark Plank Luxury Vinyl Plank Flooring in Sugar Hill from www.bestlaminate.com (I am in no way being compensated, etc. from these companies, just sharing our choice and review). We also purchased 1500 sq ft of a 6mm visqueen moisture barrier. Moisture barrier is actually not a necessity when it comes to vinyl but the company recommended it in order to increase friction between the floating floor and the subfloor (Yes, i'm sure it was just an up-sale, but we got it anyways).

This particular flooring has a beautiful color and texture. There are lighter areas and wood texture throughout. This complements nicely with the rich brown color of the plank. I like this because instead of the flooring looking country it looks more "modern farmhouse". Which is exactly what I wanted!
 

The flooring also installs fairly easily for the average DIY-er. It can be cut with a utility knife and clicks together snuggly with maybe a little gentle taps from a tapping block or something similar. We made sure to follow all of the manufacturer recommendations as well for installation.

As far as wear goes, this particular plank is 4.2mm and waterproof (some only say water resistant fyi but I'm not sure if they are actually any different). Other than that, we haven't had it long enough to determine how easily it scratches. I'll have to let you know in the future! I can say, however, that for now I'm in love with them! Can't wait to add the baseboards! For now, my daughter's messy toys will have to hide the lack there of!


Tuesday, September 2, 2014

Hole be gone!

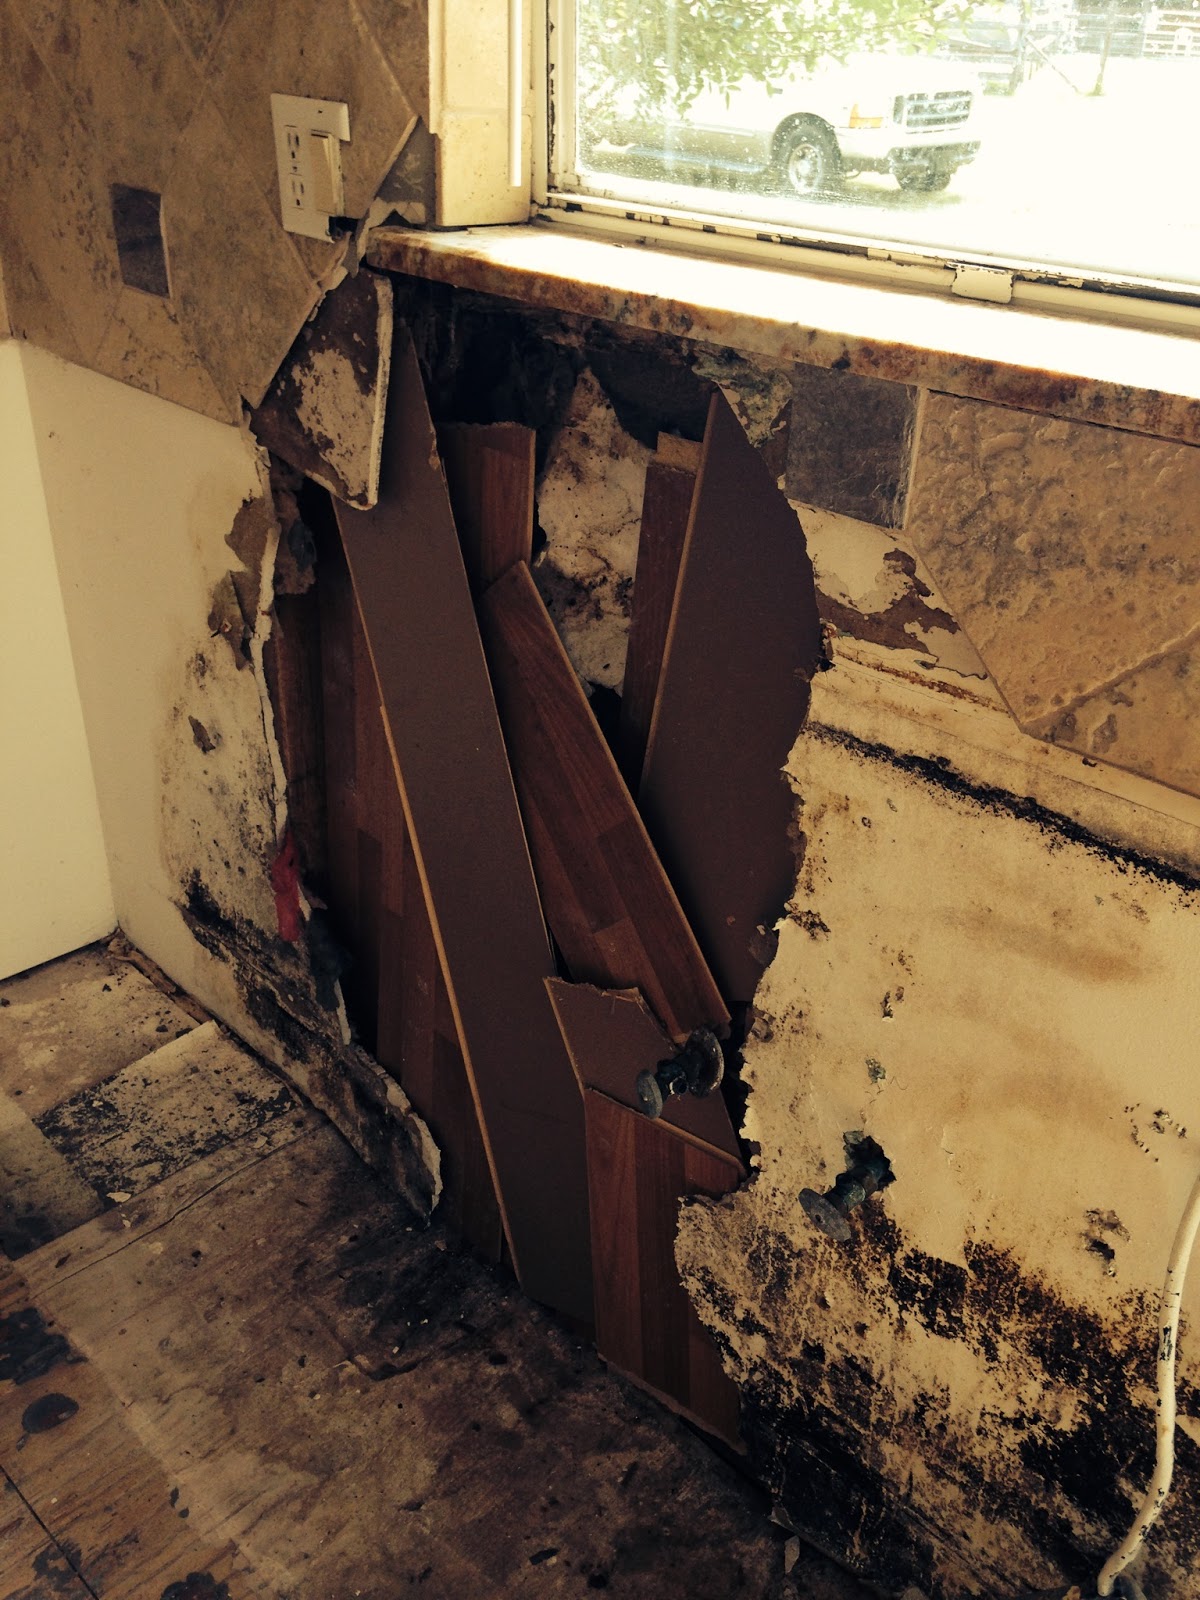
One of the biggest issues this house had was a big hole in an exterior wall. Along with this huge hole was old termite damage and rot on the wall and joists supporting the house. I think this issue scared a lot of people away from buying this home but not the Crawfords! Apparently, we enjoy a challenge! 


Yes, that's how it looked when we purchased the home! Mold and all!

 
It was such a happy day when the wall came down. I was so happy to finally not feel like we were breathing in that terrible mold every time we went there! Mold can be very dangerous and we wanted it out as soon as possible. Also, always remember to keep your vision of what the end will look like, otherwise it can get very scary having a huge hole in your future house!


One of the best decisions we have made on this house is moving the side door that is in this wall. It was on the left side of the wall (from an exterior view), but since this is actually our future kitchen, we wanted to be able to wrap the kitchen cabinets around that corner and provide more counter space. So, as you can see in the picture below, we moved the new door to the right side (and I love my new door with the blinds inside the glass!).


The wall isn't finished yet and we needs steps (notice the floating door!) but I'm so glad it's at least closed in and the hole, mold, and termite damage is gone! One step closer to the end of this nightmare...I mean...fun!!
 

Tuesday, August 26, 2014

Pallet Baby Gate

One of the first things I wanted to do at the new house was make it safe for our 20 month old. We aren't living there yet but wanted to be able to know she wasn't going to topple down the stairs while we worked. I absolutely love the look of things made from pallets and we all know Pinterest is covered with fabulous pallet designs for baby gates! I really like the barn door styles but I knew I wanted ours to have openings between the slats so we could see through to the other side. I also wanted to make sure there were few horizontal pieces she would try to climb up with. So I kept it simple, safe, and cute...


I tried 2 ways to break apart the pallets: sawzall and hammering them off. Which is better?? I learned it really depends on the pallet! One pallet I used the pieces came off much easier with just hammering them off and the other I had to use the sawzall.


I loved the look of the pallet pieces after they were sanded!

 
This gate is going to be at the top of the stairs and each slat measures 30 inches tall and 33 inches wide (I left space for a 2x4 that will be added to the wall--see pictures below). If you make one of your own make sure to measure your opening and make it custom to your purposes.


I originally had and "X" in the back to make it more barn door style but I decided that my daughter would be able to use those to climb up and I wasn't willing to risk it.

Once I had it all placed how I wanted it, I hammered it together, added hinges, and hung it. I screwed a 2x4 to the wall (which will be painted eventually to blend in) so that I would have a secure place on the wall to attach the locking hardware.  


I like this bolt-like locking system that I found at our local hardware store. Right now my daughter can't figure out how to unlock it but I will soon have to make it child proof for her. :)


I love it! Now to make the rest of the house look just as fabulous....


Side note: One of the pallets I used was pressure treated so I will have to seal the wood somehow so we aren't constantly touching treated wood. I contemplated painting it all white but I just love the look so much I can't bring myself to do it! So I think I was put a matte clear coat over it. :)


Saturday, August 16, 2014

Welcome to Crawford Acres! This home and property is our "diamond in the rough" and our future farmhouse. Join the fun (and get ideas!) as the Crawford family turns a practically gutted, run-down foreclosure into the beautiful Crawford Acres we dream of! Below are some exterior BEFORE pictures...yes the house really started out that bad!


We fell in love with this home set back on the property and the 2.5 acres where our future garden and chickens will be (and my mini goat if I can convince the hubby!). Unfortunately, since the home was a foreclosure and needed major renovations it took months to actually close on the house! It tested our patience from the very beginning! :)


Did you notice the hole in the wall?? And the missing Air Conditioner? This house has fun written all over it! The AC was stolen or taken by the previous home owner and the hole in the wall is from water damage and termite damage (not active thank goodness!).

Make sure to check back as we have already started renovations and I will be posting lots of pictures soon!